Touch Plate Stuck Switch Troubleshooting Guide.
Relay Switches
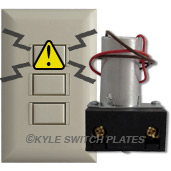
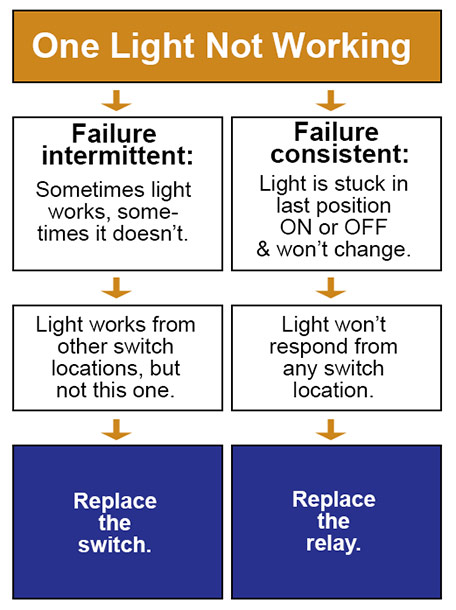
Broken Light Switch: If you can control the relay in question from one switch location but not another, the switch is the problem, not the relay. In other words, if you have several switches (on different sides of a room, for example) connected to a single relay and at least one switch on that circuit turns the lights on and off, then any switch that cannot control the lights is broken. (This could be more than one switch.) Note that Touch-Plate does not sell individual replacement switches, so you will need to replace your control switch unit even if only one of the switches has failed.
Broken Relay: If only one switch is connected to the relay, then use an ohmmeter to check to see if there is continuity through the relay. If the light is supposed to be off (relay open), and there is continuity through the relay, then the relay has more than likely been overloaded and is broken. Further testing can be done by contractors/electricians: connect the two low voltage leads of the relay to the two low voltage wires of the transverter briefly to see if the relay “thunks”. They can also test to see if there is continuity (when it clicks “on”) and no continuity (when it clicks “off”) across the holes in the rectangular block of the relay. If not, then the relay is probably in need of replacing.
Another Issue: If it appears that the relay is the problem, you can then swap the relay to a different position in the panel. If the problem follows the relay, then the relay is defective. If not, the issue is with something else in the system, for example the control board, a wiring issue, etc.
Buzzing Sound: If you hear a loud buzzing noise coming from your relay, then you probably have a stuck switch or a malfunctioning relay. To quickly figure out which part needs replacing, disconnect a switch that is working correctly on another circuit and wire it to the relay that is buzzing. If the buzz stops, then the old switch needs to be replaced. If the relay is still noisy and that is the only switch connected to it, then it is time to replace the relay.
Light Switches
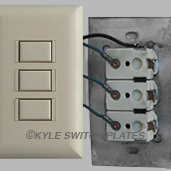
Override the switch at the wall by simply removing and unhooking the switch. Tap the common wire (typically white) to any of the low voltage button control wires. (Tap the common wire to the ON wire to turn lights on; tap the OFF wire to the common wire to turn lights off.) If the override works, the switch is either defective or the contacts on the switch need cleaned.
Take a meter and confirm continuity for each button press. With the switch removed there should be continuity from common through each button once the button is pressed.
If one LED is not working, change positions of the wires (swap a working one to the non‐working terminal and vice versa). If the problem follows the wire, then the pilot transformer is bad or the wire has been damaged. If the problem remains at that same terminal, the switch is the problem.
Transverter
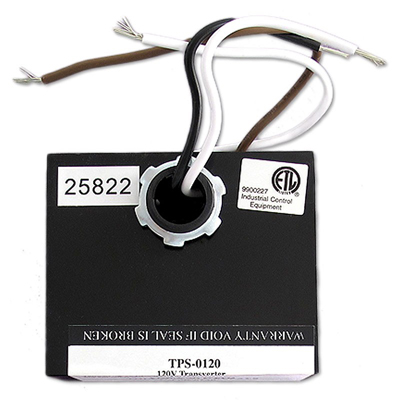
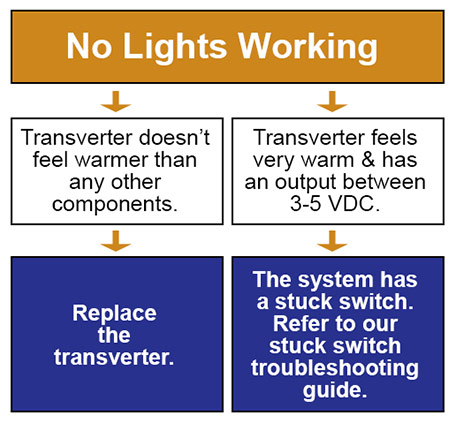
Confirm the Input Voltage - This will be 120V or 277V, whichever model is being used. Confirm and make sure a breaker is not tripped.
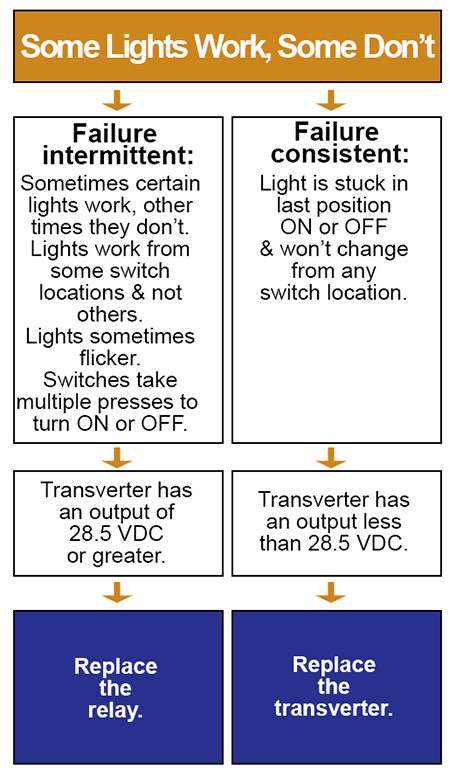
Check the Output Voltage – A transverter’s output voltage should be 28VDC ‐ 30VDC under normal operation.
(The units typically read between 40-44 VDC without a load connected). Confirm voltage with meter. If the voltage is between 3-5 VDC, the system has a stuck switch that needs to be removed. If the transverter reads 0 VDC, disconnect and wait for 5-10 minutes. Reconnect again and test the output voltage. If the voltage is still at 0 VDC, the unit is bad (either the item was damaged, or less likely, a factory defect which is rare). If the part shows voltage, there is a stuck switch which caused the unit to go into cool down mode, producing the 0 VDC found earlier. Note that the position of the lights (either stuck on or stuck off) does not tell you whether the problem is a stuck switch or a damaged transverter. Removing and testing the transverter will not affect (change) the state of the lights. You will want to disconnect the transverter from the low voltage side (so it is not connected to the stuck switch) to test it. If the voltage is lower than 28.5 VDC it is a bad unit.
Flickering Lights
Q. I installed a new relay and switch but my lights started to flicker after a few days. What would cause this?
A. Flickering is almost always caused by a weakening transformer. The relay is getting insufficient power and it cannot hold the next position when triggered. Test the transverter first. While it's more common to have failures with 2-3 relays when the power supply starts to weaken, sometimes a single relay can start experiencing issues. As time goes on and the unit weakens, more will start to become intermittent/erratic as well. If you check the transverter voltage and it is normal, then next check the actual fixture itself and the wire connections on the line voltage side (both at the fixture and at the relay). There may be a loose wire which is causing the light to flicker when the power is lost. It's very unlikely that it is a relay problem. A relay does not fail in this manner. It will either not work at all or work intermittently, but it will not cause the light to flicker.
PL-6 Transformers
In very old systems, PL-6 transformers power the pilot lights. It is rare for the the PL6 transformers to fail, but if they do, the only result would be that your indicator light on the master switch would no longer work. The rest of the system would continue working normally.
If you have a light not working on existing master switch, it is much more likely that the bulb in the switch has burned out. It probably has nothing to do with the pilot transformer.
If the overhead lights are not working, the pilot transformer is NOT the problem. You can remove the PL-6 from your system and then continue troubleshooting following the suggestions above. If you want pilot light functionality again you could replace each of the PL-6 transformers with this Pilot Light Transformer in your system (try swapping a working one to the problem location to confirm the bulb still works) or you could upgrade your panel to one of the ZoneZ lighting systems.
If the actual room lights are not working, the problem would be with the relay or transverter. An easy rule of thumb for understanding what type of failure is occurring would be this:
- If it is a widespread failure affecting much or all of the existing lighting system, the transverter is the issue.
- If the failure only affects one light, then the relay or the switch is the issue.
Older Touchplate System Wiring Setups
In very old Touchplate CC and CCN setups, White, Orange, Red, Blue, Yellow, Green (Aqua, Teal), and Black wires were often used but there was no standard regarding which color wires were used on any particular terminal. You will need to look at the current setup to match up your wires to the new terminals.
Additional Tips
Visual Damage: Check to see if there is blackening on the parts or if there is a burnt smell. This simple check may quickly reveal which part is damaged and needs to be replaced.
Which System?: Not sure which low voltage system you have? Identify Your Low Voltage Light System will help you figure it out and point you to the correct replacement parts.
Shop Low Voltage Wiring Replacement Parts for vintage GE Lighting, Bryant, Sierra Electrical, Remcon, Pyramid, and Touch-Plate Lighting Controls.
Vintage Upgrade Notes
If you have an old Remcon system, update with new Remcon relays and Touch Plate switches.
If you have an old Pyramid system, replace parts with Remcon relays and Touchplate switches.
If you have an old GE, Sierra or Bryant system and prefer the updated look of Touchplate light switches (instead of the new GE switches), use GE relays and Touch Plate switches.
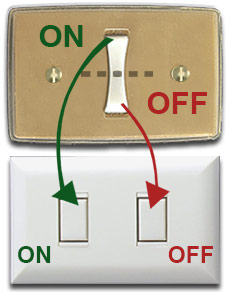
Double Your Switches In all three examples above you are changing from a 3-wire system to a two-wire system and so must double the number of buttons on your switches. In other words, for each old Remcon, Pyramid, GE, Sierra, or Bryant switch, choose a Touch-Plate switch with two buttons (one is ON, the other is OFF). One > Two, Two > Four, Three > Six, Four > Eight, etc.
Tip If one switch is broken, try consolidating all good switches on a single bracket (for two, three, four switches) to minimize the number of new controls you need to purchase.

