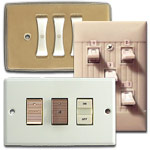
This Remcon low voltage lighting troubleshooting guide will help you determine which parts of your Remcon wiring system need replacing. Info found here also pertains to Pyramid low voltage systems. Before you start to troubleshoot your system, make sure all light bulbs are working in any fixtures (ceiling lights, table lamps, etc.) on the circuit you are testing.
Master Selector Panel
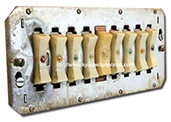
How It Works: Remcon systems have an unusual remote control master panel that allows you to turn on and off all lights from a single oversized rocker in the middle of a 9-switch panel. These convenient pilot lighted controllers were often installed by the front door, back door, and/or in the master bedroom of a home. Pilot lighted switches illuminate when the load (light, pump, etc.) is on so you can tell if lights are left on in a far section of your home. This central override control was also a safety feature that would allow you to instantly illuminate any area of the house, for example, after hearing a window break at the far end of your home.
Central Control: Each of the four switches on either side of the central master selector switch is typically connected to one or more lights in a section of your home. They provide master override control of lighting in eight areas such as hallways, bedrooms, and outdoors. The central switch is connected to a copper bar that runs the length of the panel. When the master switch is pushed, a copper bar makes momentary contact with all the switches at once thereby turning all lights on (up position) or off (down position). There are no switches directly wired to the master switch, and any master functionality would be lost once updating to new switches. Note that this master control panel fit a 4-gang box. Note that if you want the same type of functionality as a master switch in an updated system, you would need to upgrade to a Touch-Plate panel with grouping capability that could control multiple lights at one time. (This is only possible if the current Remcon relays are arranged in a panel layout in one location, rather than installed remotely in each room near the light fixture.)
Test Independently: If lights in a whole section of your home are not working, the switches in one of these controllers may have started to fail. You will want to independently check all the switches and relays to ensure that none is responsible for the lighting problem you are experiencing. To accurately test your switches and relays in other areas of your home, you must disconnect each switch from the master controller panel and test just a single switch and relay attached to a light.
Transformer and Relay All in One
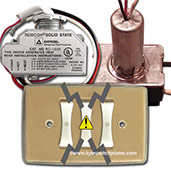
Remcon Difference: Remcon relays were unique in that each unit was actually a transformer with a built-in relay, unlike other low volt systems where the transformer and the relay are separate components. Vintage Remcon relays were a mechanical latching type with a solenoid inside a cylinder on top of a square base. (Righthand relay in photo.) In contrast, the new relays are solid state units that are flat on the front and back with stepped sides and a locknut on top for mounting into a metal electrical box. (Lefthand relay in photo.) Remcon relays were typically installed near the light fixture.
Pilot Light Functionality: Note that even though these old curved rocker switches were lighted when on, that pilot light functionality came from the advanced engineering of the specialized switches used in conjunction with the combination relay/transformers. Unfortunately, replacement LED lighted switches from other brands won't illuminate because the interaction of the newer switches and relays do not function in the same way.
Important: Do not mix & match relays the same circuit, whether solid state vs. mechanical vs. Touch Plate brand. Also, only Remcon relays should be used with Remcon switches. All Remcon relays on a circuit/phase must be the same type: either old mechanical latching or new solid state; they cannot be mixed on either side because of the difference in the control circuit. If using the new Touch Plate powered relay packs to create a new standalone 2-wire system, these too must not be connected in any way with the Remcon part of your system (no shared common wires, no connection to master panels). Note that any switches connected to each other or to the relays (any parts connected in any way) must all be on the same circuit/phase. Remcon made two types of relays: Remcon light relays (typically mounted in the ceiling near the light fixture and Remcon closet relays that that control a closet light by opening and closing the door, both of which were made in very old mechanical latching versions as well as newer, more-recently discontinued solid state versions. If you want to upgrade you may choose to replace the complete system with new electrical panels, relays and switches from Touch-plate Lighting Controls. NOTE: Remcon relays are no longer manufactured.
Discontinued Remcon Relay Upgrade and Replacement Path
A system upgrade is required if you need to replace all of your Remcon relays because they have been discontinued.
Touch Plate Lighting Control offers new Universal Lighting panels that work with all types of switches. Dimming panel options are also available.
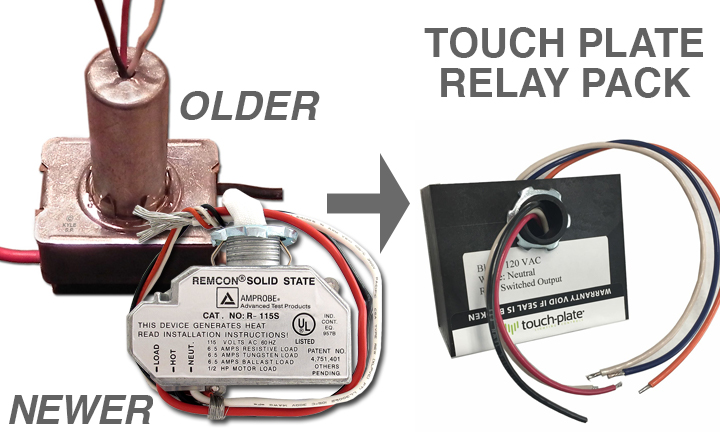
If you need to replace all your Remcon relays, update your system to Touch Plate.
If you just need to replace just a few relays, the easiest solution may be to buy new Touch Plate relay packs and switches. By upgrading your relays to Touch Plate, you don't need to double the number of switches when swapping out your outdated Remcon switches because these create mini standalone 2-wire systems; when used with the Touch Plate power pack each Touch Plate button presses on and off.
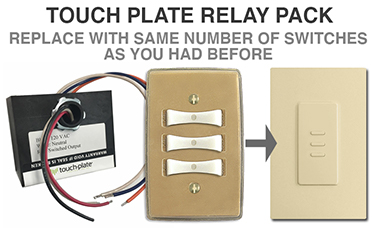
Choose from any of Touch Plate's modern low voltage lighting series. For the most flexibility when selecting cover plates, shop Touch Plate Ultra switches which fit into standard rocker wall plates.
IMPORTANT: Touch Plate relays cannot be mixed with any Remcon relays (whether older mechanical latching versions or new solid state versions) in a Remcon system. They are NOT compatible. A Touch Plate panel upgrade can be used with the Remcon wiring in the walls when replacing all the parts - relays (with their built-in transformers) and switches. You can retain your current wiring and avoid the expense of rewiring your home.
Remcon Replacement Relay Options - How to Determine the Best Path
1. Move/Reuse Remcon Relays and Keep Old Remcon Switches
If you wouldn't mind combining two light control areas, you might be able to use one Remcon relay to control two lights at the same time in a less-used area. This would free up an extra working relay that could then be moved to the location where another relay has failed. The would be the least expensive approach, but just be sure that the wattage of the two shared fixtures combined does not exceed the limitations of the vintage Remcon relays (whether the mechanical latching or solid state versions) that is usually printed on the bottom of the relays. Also check that any connected switches to not appear to be sticking or maintaining contact for any reason - paint on switches, pinching or broken plates, grime buildup from years of use - as this could cause the replacement relay to also fail.
2. Use Existing Remcon Relays and Replace Switches with Touch Plate
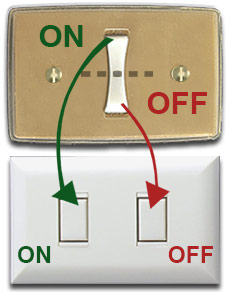
If you are using the old Remcon relays (3-wire system) and only updating the switches, then you would use Touch Plate switches (2-wire) and DOUBLE the number of buttons. One Remcon rocker ON/OFF button now becomes two separate Touch Plate buttons (one ON/one OFF). A wiring diagram is available for this simple conversion from 3-wire switches to 2-wire switches.
For example, if you have a Remcon control station with 3 switches and all are working and you plan to keep using the Remcon relays, then you would select a Touch Plate 6-button unit. Button one pushes ON, button two pushes OFF, button three pushes ON, button four pushes OFF, etc. (Remcon Relay + Touch Plate Switches = Double # of Switches) Here a couple of choices:
https://www.kyleswitchplates.com/touch-plate-switch-classic-6-button-low-voltage-control-white/
https://www.kyleswitchplates.com/touch-plate-ultra-6-button-low-voltage-switches-white/
Note that you would select any of Touch Plate's unlighted switches. (Because of the unusual way Remcon powered their pilot lighted switches, this capability doesn't transfer over.)
3. Replace Remcon Relays - Use New Touch Plate Powered Relay Packs & Switches
If you are replacing Remcon relays, use the new Touch-Plate Powered Relay Packs (PRP) along with new Touch Plate switches. This creates a mini standalone 2-wire Touch Plate system (so you DO NOT double the number of switches). Replace any Remcon switches on a 1-1 basis: one Remcon rocker is replaced with one Touch Plate button. (Old Remcon switches cannot be used with Touch Plate relay power packs.)
https://www.kyleswitchplates.com/touch-plate-low-voltage-powered-relay-pack-nipple-mount/
Installation Notes
Please note that any locations using the PRPs must be on a separate circuit (no mixing and matching) from the Remcon relays, and no wires can be connected to any master panel or wired in parallel with any switch on another circuit. The PRPs also fit a 1/2" knockout but are larger than the old Remcon relays/transformers, so be sure to check whether they will fit inside your current boxes or will be connected outside of it with the nipple connection. The nipple mount versions are fully contained units. (If using the panel-mount power pack, it must be contained within a fully covered box.) Note that installing on a separate circuit means that Touch Plate relays and power packs must not be connected to any other Remcon relays. Being on a breaker together is fine because the breaker is just providing the line voltage to everything that needs power. It’s the low voltage that they can’t share.
For example, if you have a control station with 5 switches and 5 relays where one of the relays is bad, then all 5 relays and all 5 switches would need to be replaced with 5 PRPs and a 5-button control station (such as the Ultra 5-button switch station) and moved to a different circuit. Each button pushes on/off. (Touch Plate PRP = Same # of Switches)
https://www.kyleswitchplates.com/touch-plate-ultra-5-button-low-voltage-light-switch-white/
Note there are other less expensive Touch Plate switch controls for 1-, 2-, and 3-button units here:
https://www.kyleswitchplates.com/touch-plate-5000-low-voltage-light-switches/
Other Tips
We recommend drawing out which control stations will be using which relay power supplies in order to keep track of the types of switches that should be connected to it.
Finding The Defective Parts
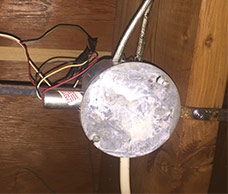
Bad Relay: Once you have a single switch connected to a relay, use an ohmmeter to check for continuity through the relay. If the lights are supposed to be off (meaning that the relay switch is supposed to be open), but there is still continuity through the relay, then the relay probably has burned out from a stuck switch or simply worn out from years of use.
If you don't have a meter, then you could also test your relay by removing the switch that is currently connected to it and putting in a working switch from another location. (Just be sure you are wiring it correctly.) If the new working switch doesn't function in the problem location, the relay likely is broken; if the lights do come on then the old switch was broken. (Be sure you are not mixing mechanical and solid state relays on the same circuit.) If the newly installed switch is requiring multiple button pushes to change the relay state (ON to OFF/OFF to ON), then the relay is likely failing. The relay may have been damaged by a stuck switch or it may just be worn down from years of use.
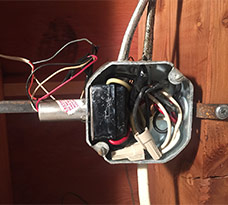
Buzzing Relay: If a loud buzzing noise can be heard coming from your relay, this usually indicates either a malfunctioning relay or switch. You can quickly figure out which component is damaged by unwiring a working switch from another room and connecting it to the noisy relay to see if the buzz stops. (Just be sure that only one switch is connected to the relay and that it is not connected to the master control panel because you might have two bad switches connected to it.) If the relay stops buzzing, then the switch you replaced was defective. If the relay still makes that buzzing sound after testing all of the switches that were connected to it, then it is your relay that is defective. Shop replacement Remcon relays.
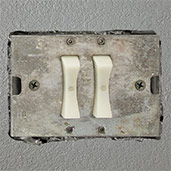
Bad Switch: If multiple light switches (for ex., several on one switch plate or those installed on two sides of a room) are connected to a one particular Remcon relay and at least one of those switches on that circuit still allows you to turn lights on and off, then any switch that cannot control the lights is broken. In other words, if the same relay can be controlled from one switch location but not another, then switch is the problem, not the relay. (Remember, there could be more than one switch on the circuit or the switch also may be connected to a master controller so be sure to check all connections.)
Remcon switches were often permanently mounted in a bracket unfortunately making it harder to swap individual working switches into locations that potentially defective switches. These switches are no longer manufactured so we recommend Touchplate switches as replacements which have been tested for safety and longterm reliability with vintage Remcon systems.
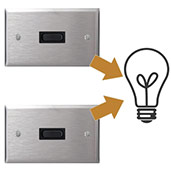
3-Way Switches: Remcon switches may have been wired in parallel to create 3-way low voltage switches. Three-way switching allows you to control one light from two locations in a room, or to control the lights from one switch (or more) within the room as well as from the master controller in another part of the house.
Remcon Light Switches
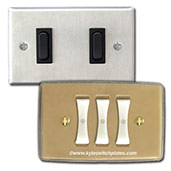
Remcon switches came in two varieties: the earlier bowtie or wing-shaped illuminated switches and later, the small black switches which were not pilot lighted. Both of these switches were discontinued.
To check the wiring on your Remcon switches, override the switch at the wall for testing. To do this, simply remove and unhook the switch, then tap the common wire (usually white) to one of the low voltage button control wires. If doing this direct testing of each of the wires works (lights come on or turn off), the switch is defective.
Take a meter and confirm continuity for each button press (meaning that the expected action - either ON or OFF - occurs if the button is pushed). With the switch removed there should be continuity from common through each button once the button is pushed.
Touchplate switches have been tested to be safe and compatible with vintage Remcon systems. If you need to update your wall plates or switches, we recommend units from Touch-Plate Lighting Controls.
Shop Touch Plate replacement switches for Remcon systems.
Replacing Your Remcon Switches
While Remcon switches have not been manufactured for years, you do have upgrade options:
For vintage Remcon systems, update with new solid state Remcon relays and Touch Plate light switches.
Vintage Pyramid systems also may be updated with Remcon relays and Touchplate switches.
Double Your Light Switches: In both examples above you are changing from a 3-wire system to a two-wire system where each end of the switch is now a separate button. As a result you must double the number of buttons on your light switches. The old rocker switches are now split into two with the UP/ON direction and DOWN/OFF direction becoming two separate buttons.
In other words, for one old Remcon or Pyramid switch, select Touch-Plate units with two buttons (one button become the ON switch, the other becomes the OFF). So One becomes Two, Two becomes Four, Three becomes Six, Four becomes Eight, etc.
Tip: If one switch is defective, try to consolidate all good switches onto a single bracket. This may or may not be possible depending upon the specific Remcon switches your have. Save any old working switches for swapping into brackets for two, three, four switches to minimize the number of new control units you need to purchase.
Consolidating Your Remcon Relays
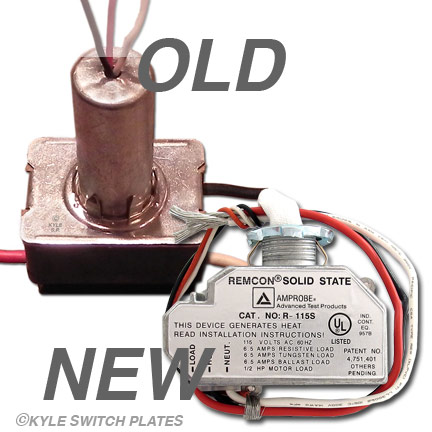
If you are keeping all your working Remcon relays and reconfiguring your switches, just be sure the older and newer (now both discontinued) Remcon relays are not on the same circuit.
Replace broken Remcon relays with new Touch-Plate relay power supplies only (and not regular Touch Plate relays) and move any switches connected to them to a new circuit. If you are also replacing the switches with new Touch Plate control stations, then you DO NOT need to double the number of buttons.
If you have the older cylinder type mechanical latching relays and are consolidating those with the newer solid state relays, you will need to move around the relays to ensure all the same type are on the same circuit/phase. (Save any working relays to replace any that fail on circuits where you are keeping the old relays.) If you are using the old Remcon relays AND updating your switches to Touch Plate, then you DO have to double the number of buttons.
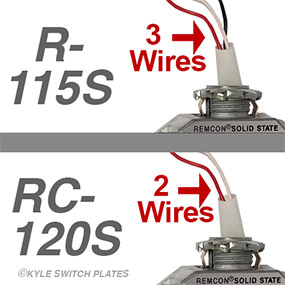
There are 2 Remcon Relays - be sure to order the correct one:
The R-115S is for the lights throughout your home. These basic relays have three low voltage leads on top that connect to normally-open momentary contact light switches.
The RC-120S is for closet lighting - if your closet lights come on automatically when you open the door, you'll need this relay. These closet relays have two low voltage leads on top that connect to normally-closed closet contact switches. Opening the closet door opens the contact and changes the state of the lights to ON. Closing the door closes the contact and turns them off.
Additional Tips
Visual Damage: Check for any blackening on the parts or if they smell like they have burned. This simple check may reveal which component has been damaged and needs replacing.
Safety First: Use caution when testing electrical devices to avoid the risk of shock and consult an electrician.
Which System? Not sure which low voltage system you actually have? Review how to Identify A Low Voltage Lighting System. The photos will help you figure which low voltage brand you have and what your replacement options are. Kyle Switch Plates provides replacement parts for Remcon, GE, Bryant, Sierra, Pyramid, Touch Plate and other low voltage systems.

Questions & Answers
Q. When I push the button the light stays on, but as soon as I release it, the light fixture goes off. Why?
A. That is probably a relay issue because it sounds like the relay isn't latching into the new position (changing either to ON or to OFF). A new relay should fix that. If you aren't sure, you can swap a working relay from another location into that spot to see if that fixes your issue.
Q. How do I connect all the common wires to fit into the Switch Common (SC) terminal slot when I have one than one?
A. If you have two, three, four or more common wires, you would connect all them together along with another wire (pigtail) using a wire nut cap, then just insert the one pigtail wire into the SC terminal.
Q. Can you recommend an electrician to work on my Remcon system ?
A. Remcon low voltage systems are basically very simple but some electricians may feel intimidated if they are not familiar with them. Customers have had success by reading up on the information on our website in order to clearly explain what work needs to be done. You can do some simple testing then have the parts ready. Or you ask the electrician to do the simple testing then buy the parts and have them come back a second time. Ex. I tested my switch and relay. In one location I need a combo relay/transformer replaced along with the switch connected to it. In another location I just need the switch plate unit replaced. I have wiring diagrams for each. Then try reaching out to electricians who have been in business a long time and may have experience with these systems.
Note: Electricians unfamiliar with the system may suggest removing the whole system but this involves opening up all the walls and running heavier wire between the switches and the light fixtures which can be very expensive. This is seldom the route taken as faster, easier, cheaper solutions are available to get the lights back on and working properly.

